Friday, January 28, 2011

Pig Party Birthday

This last weekend we went to Kara's good friend Raleigh's birthday party.  She turned two years old.  It's crazy how time flies.  I remember just the other day when we found out they were pregnant and then we were pregnant 9 months later.  It's fun to have another girl, so close to Kara's age.  Here are a couple pictures of the party for ideas for anyone wanting to plan a Pig Party:


The Birthday Girl with her piggies.


Blowing out the candles on the cute pig cake.  


Time for presents.


Pig noses made of hearts.  It was near Valentine's Day, so it made for an easy pig nose.  She had them cutely displayed around a vase. Wish I would have gotten a pic of that.


Here's our attempt at a group shot of all the piggies with their noses. Quick parents get out of the shot!


HA!  Yes, that's my screaming daughter on the right, with my husband to the side laughing at her.  Good times!  Besides the birthday girl and Kara I think the pig noses went over quite well ;-)


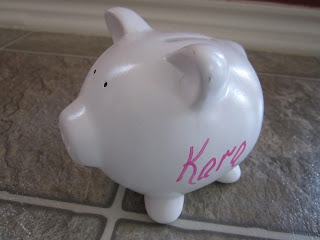
For the party favors we got a cute little piggy bank with Kara's name written in permanent marker on it.  There were white and pink ones for the girls and blue ones for the boys.  So cute.


She handed them out like this, with the piggy cake ball in it.  Really cute.


Some close ups of the cake balls.  What a cute idea: pink m&m's and chocolate covered sunflower seeds for the ears.  And they tasted Soooo good.  They were cutely displayed in a big cake ball bouquet, which I once again should have taken a picture of, dangit.


The menu for the party was going to be pigs in a blanket, but it was switched to piggie dogs in a bun (aka hot dogs).  What a fun day.  Kara was even given the birthday girls' balloon to take home.  She had tons of fun in the car with it.  Good times. Happy Birthday Raleigh!

Thursday, January 27, 2011

Saturday Market Skirt

I found this adorable link for a market skirt at Made Blog.  I love all the bright colors and decided to make one for Kara to wear come next Spring.  Here it is.  I wanted to make the pockets with buttons but I ran out of white fabric, so I added a 'K' for Kara.  I used white felt and just sewed it one.  Super simple.  I can't wait to make another one with the pockets and buttons.....hmm...I feeling like orange would be cute. 


I'll add a couple picture of Kara wearing it come Spring.  It's a little big for her now because I planned it to fit her in 3-4 months or so.

Wednesday, January 26, 2011

Quiet Book #2: Pumpkin Page

Here are the plans and the finished product.  This one is so easy and I forgot to take pictures as I was making it, but as you can see, there's not much to it.


First, I cut out all the pieces.  Then started by sewing on the pumpkin.  I started where the stem was and slide that just under the pumpkin.  Don't sew down the stem, which will leave it more fun for the kiddos to play with.


Next, I sewed the bottom of the box.  Then I sewed on the rick rack on the top of the box.  Next, I sewed on the box top.  That's pretty much it.  Since, I started to create this quiet book, I decided that I was going to make 3 books.  What I'm going to with the other two I'm not sure yet.  I'll either sell them or give them as gifts.  But here they are, all happy 3 pumpkins.


And here are the face pieces that I cut:  hearts, circles, squares, triangles and then 3 mouth variations.


You may be wondering why I didn't put on velcro on the pumpkin or pieces.  Well, my thought is that if the pieces get lost it will make it a lot more time consuming and costly to repair them.  Also, if I truly want Kara to be able to use this in church, as a QUIET book, then I want it truly that: QUIET, no velcro noises.  Well, there you are.  Enjoy! 


Quiet Book #1

I have recently been wanting to make a quiet book for Kara.  There are so many awesome ideas online.  I got so many ideas I had to find some way to organize all the pages I wanted to create.  So, here's what I came up with and as you can see there are A LOT of pages I want to make:


Here's a close up of what I did.  I just drew a sketch of the idea and little notes about any pockets, snaps, velcro or movement the details on the page do.  I also put a list of the bookmarks I marked from different blogs and such, where I had got the idea.  Although, some are my own ideas ;-) 
This is one for a purse page:


 If you are on this journey of creating your own Quiet Book, I hope that this will help you get a little organized with your ideas, as it did for me.

Thursday, January 20, 2011

Felt Grape Bunch

After I made an orange slice, a couple red apples and about a dozen strawberries, I thought there were too much warm colors going on so, I chose to do some nice cool green grapes.  Then I found a sample on another blog (will include the link, once I find it again) that gave me the idea to add velcro to each grape.  But the way they had it, it was just a flat grape bunch with velcro grapes on the top.  Wanting to make everything as realistic as possible, I figured if I just made two bunched and put them back to back Kara would be able to pick off grapes from either side of her grape bunch.  Ahh...the wheels are turning.  Now, to actually create it.

First I cut out 44, yes I said 44 grape circles.  It is a lot, but think about the cool factor of having a bunch of felt grapes, it will get you through all the cutting.  

Next, I cut out 2 of the grape bundle shapes.  You can make you're shape any way, I just messed around and this is what it ended up like. So this will give you 11 grapes on each side, or 22 grapes total.

Start by cutting 22 small pieces of velcro that will fit on the center of your grapes. Separate the hooks from the soft side. Now I thought it would be best to put all the hook sides on the bunch so that way when Kara was playing with the grapes it would have the scratchy side touching her, but after making it and seeing how she plays with it.  Mind you, she's only 16 months, so she tries to just shove the grapes on any which way she can, so even if she puts down the regular side of the grape, it still sticks to the felt and it's starting to tear up the felt a little bit.  All it takes is a little training on my part to teach her how to match the white velcro together, but keep this in mind when choosing which side to put on the bundle and  which to put on the grapes.

Sew 22 pieces of the soft (or hook) side of the velcro on 22 of your green circles.

Next, sew the matching sides to those 22 circles, leaving a small opening to stuff your grapes. If you wanted to take more time you can increase the size of your grape, and turn them inside out for a cleaner look but I'm just going to user friendly stuff as I'm still a sewing novice :-)

Stuff all your grapes and sew them closed.  Go around all your grapes and trim off any excess felt, to make sure they have a clean smooth look. Now you have 22 adorable grapes that just need a vine to be on. 


Take your bundle shapes and figure out where you want your grapes to sit, making sure there's 11 on each side.  Pin the velcro in place.  Then sew them on.


Create your stem by taking a small scrap of brown felt, rolling it and sewing it together.


Pin it under one of the bundle shapes and sew it on, making sure to go over it a few times because it will be pulled on by your kiddos.


Next, pin the 2 bundle shapes together. Put on all the grapes.  Now in order to have a really clean looking grape bunch you need to trim down any extra felt that does not need to be there.  Cut as close as you can to the actual grapes but make sure to not cut off the velcro.


Once you've trimmed off enough extra and you like the way it looks, pull of all the grapes and sew the two bundles together. You may not need to but because I knew there would be a lot of pulling on these I sewed around it twice, just to help give it some extra strength.


Now, pat yourself on the back because you just did a ton of sewing.  And to show for it: an awesome bundle of felt grapes for your kids to have fun pulling off and serving to their friends. 


Wednesday, January 19, 2011

First Things First

Well, here is my first post to this most awesome beginning of my blog.  I thought it best to list some goals for my blog and well, mostly, my life in general:

-To learn to have fun in everything...even in my failures (this means I will hold my pride and let you learn from my mistakes)
-To always look for new and sometimes better ways to do things (I realize everyone has great ideas, a lot are better than mine, so please share them so we can all learn and grow together)
-To focus on making God center of our family and finding ways to include him in everything I do and make (be looking forward to some fun bible activities for you kiddos)
-To make every moment a teaching moment. (this means I will try to not just make stuff but also include some fun facts so you can use it to reinforce a lesson for you kids)

Well, there you have it.  I'm sure I could go on and on about what I really want to do with this blog, but intimately I just want to just be me, even if nobody's listening....Is anyone listening?  hello?