When you move into your house and can only afford a nice washer, but not dryer, you learn to work with what you have. What I have is a nice metal laundry hanger in my backyard that my husband and father-in-law put in over a year ago. Clothes dry faster by the sun and I'm saving tons of energy. So, to help reinforce helping mommy hang laundry I saw this idea on 'Doing Without' and I just had to make it!!
Here's what the finished product will look like:
First start by cutting out your pieces of grass, poles, clothes, and basket.
The basket has a really cute weave to it. I loved the idea on couple other pages and I wasn't sure how to implement it but just tried and it ended up being super easy, just a little time consuming.
Cut out two tan basket rectangles. Then cut them into strips. One box you will cut into 8 horizontal strips, while the other box you will cut into 7 vertical strips.
Then all you do is start weaving.
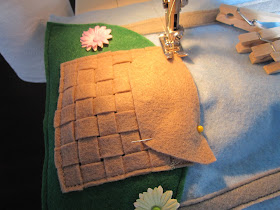
Now, when I finished weaving it, I found that I ended up leaving out 1 horizontal and 1 vertical strip. Also, the last horizontal strip on the top of the basket, I just laid completely on the top, to give it that clean edge on top. Now the tricky part is to sew it. As you can see, I flipped it over, so I could make sure to get all those edges sewn on to the top strip. You can adjust and nudge the strips as you go.
Here is what it looks like once it's all sewn:
Just trim off all the edges to give it a nice clean look and here you go:
What a cute little basket to collect apples in :-)
Then attached a snap on both the basket and the lid, making sure there's enough room on the lid to sew onto the background of the page.
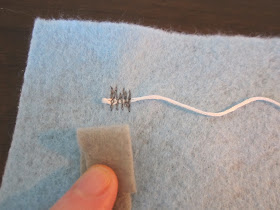
Next, you'll be getting the poles and string ready. I used embroidery thread because that's the only thing I could get to fit through the metal holes on my mini clothespins. I just eyeballed and left a little extra.
Placed the poles where I wanted them. Spaced out each string, so I knew where it needed to be placed and then I just lifted up the pole and sewed A LOT over the string. I knew this page would have a lot of tugging and pulling, so better to secure it now then to try to fix it later.
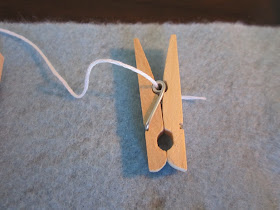
After I did one side I attached the four mini clothespins onto the line. Making sure to go through the metal loop on them. That way they can't get lost from the book!! Amazingly awesome!
So, here's what you have.
Then just sew the other side of the string under where the pole will set. Going over quite a few times. Snip the extra string off and repeat for the second string. Then sew down the poles for your drying rack.
Next, you need to place the flowers on your grass. I just used my scrapbook flowers I had around. I don't know the longevity of these flowers, but you could also use buttons too. Attach those, then sew on the grass hill.
Add your basket by sewing right on the same line as before. Then snap the lid on and sew over the top of the lid.
Cut out a bunch of clothes for your little one to play with. I made more than enough. My favorite is the little pair of underwear :)
Then had the page over and let your little one at it! Kara loves this page, but I need to mount it to the book for it to be easier for her. The clothespins are a bit heavy without a thick page behind it. But all the same.....she had a BLAST!
Happy crafting!
Pages
▼
Wednesday, June 29, 2011
Tuesday, June 14, 2011
Foosball Championship (a.k.a. Ryan's Birthday Party)
Well, I wanted to plan something really fun this year for Ryan's birthday. We just recently got new Foosball men for our table...so what could be better than a Foosball Championship?! Nothing, that's right! So, with a little printing, planning and preparation, here is what conspired:
These are the invitations. A foosball man and I added all the party details on the back. Then printed them on tagboard and cut them out around the foosball man.
I printed off a bunch of foosballs and more foosball guys to hang up.
There are going to be 6 couples total, so we're playing a double elimination game, so each team gets an adequate amount of play time. Here's the bracket:
I just cut up some index cards and gave it to each couple to decorate however they wished with their Team Name. Some of them were quite unique, lol.
For the menu, we had Foosball cookies... (oreos with white buttercream frosting)
...a Foosball Field 7 layer dip. (just like normal, except I put the guacamole on top and used some sour cream to create the lines)
...plus all the other yummy goodies that you need at a party.
Here was a fun kid version of foosball. It would have been better at a slightly larger table, so the kids couldn't reach as far, but they still had fun. I found the puppets online somewhere (I'll have to look to find the link again) and used an empty tomato can box as the two end goals. Would have painted them like nets, but alas, I ran out of time.
Here's the guys acting out the game. Yes, I forced them, lol.
Well, we had lots of fun. The games got pretty heated at times. All in all, who came on top?
That's right....Ryan and I (The Bed Intruders,lol). But that should be expected, right? We are the only ones who own a foosball table so it would look to sad if we lost. Fun times for everyone who played though. Here is the prize basket, which ended up going to the runner ups: The Jones'.
Yes, that's a foosball I taped to the Itunes gift card. It made it look like he's kicking the foosball. Awesome. Fun times! Can't wait until next year :)


