Pages

Wednesday, March 26, 2014

Jesus Chooses His Disciples

Our theme for this weeks Bible lesson is "Jesus Chooses His Disciples".

Our memory verse that goes along with it is John 15:16:

"Ye have not chosen me but I have chosen you and hath ordained you that ye should go and bring forth fruit."


Our verse was when Jesus was speaking to his disciples but we also talked about how he speaks to us too. Once we have Jesus in our hearts we become one of Jesus' special friends (disciples) and so we are also 'ordained to bring forth fruit'. What does it mean to be ordain? Well, we talked about how it means that god has a special plan for us. He has made or appointed us for a specific purpose. 

And what should we do now that we know God has given us a special purpose? We should GO! We should go and do what he has called us to do. We shouldn't sit around expecting other people to do things or think that other people are more equipped than us. No! We are called to 'go'! 

And what happens when we go and do what God has called us to do? We will bring forth fruit! Does that mean we are going to be growing strawberries on our arm? Or watermelons on our back? No! It means that if we do what God has ordained (or called us and made special for his purposes) us to do, then we will "make our lives count for God". 

So here's another way we could say this verse: 'Ye have not chosen me but I have chosen you and appointed you that you should go and make your life count for God."

Along with our memory verse work we did our flannel board lesson which goes through the story of how Jesus finds and calls his disciples. Our story touched on how some men were John the Baptists disciples and we're learning from him until Jesus walked by and John said he was the Messiah, so these men started following him. Later we saw how he found four men who were fishermen and how he asked them to follow him. (This was the main focus of our story and we elaborated how they chose to leave all they had and now fish for men).Then we see him asking a couple other men to follow him like Matthew and Philip. We also saw how Jesus wanted 12 men and he had chosen some but didn't know who else to choose so he went to a mountain and prayed and seeked his father god for guidance on the matter. And after that he chose the other disciples until he had: twelve. 

Some key points we focused on:
-none of the disciples were alike. Some could do one thing. Some another. Some examples:
-Andrew and his brother and friends could manage boat
-Matthew was good with math and keeping records
-judas took care of the money
- Thaddeus meant praise, so maybe he was happy. 
-Thomas was a sad and more thoughtful person. 

-Each would help Jesus in different ways but there was something that each of them could do. 

-What things can you do to serve God? Are you a good writer? Public speaker? Teacher? Are you good at singing? Are you good at witnessing and telling others about Jesus? Or are you really kind and just help to make people feel welcome? EVERYONE  has a gift they can use toward God. And none are greater than others. 

-No one can do everything well but every person can do something well. 

-He chooses for us to work for Him in the way that He made us! 

After our lesson we did sing "I will make you fishers of men". And we started listening to "The Twelve Disciples" by Bryan Sirchio, which helps to teach the names of the twelve disciples in a fun way. We have plans to listen to it all week until we get them all! Which Kara's amazing memory has already got half of them this morning. I found a coloring sheet of all twelve disciples for her to color too, while we listened to the so g over and over. 

Hope you have a fun time learning about how Jesus chose his disciples (and us) for a purpose. And we have to 'go!' to be able to bring the fruit to our lives. 

I would love to hear of any other ideas you have for teaching on the twelve disciples. We are always looking for fresh ideas to add to our Bible time. 

Until next time, Happy Bible Teaching! And God Bless!

Heather Joy

Wednesday, March 19, 2014

Minnie Mouse Birthday Party

My sweet baby girl is not a baby anymore, but a toddler!  I can't believe she turned 2!  Lately she has been obsessed in Minnie Mouse and since we don't watch much TV and it's the first character that she's really recognized, I think it is just the sweetest thing that she knows about Mrs. Mouse without even seeing her on any shows.  So, of course we had to plan a Minnie Mouse Birthday Party, and I can't wait to share what we did with you!


Before the party I found some cheap headbands in the clearance section of Hobby Lobby and made them into mouse ears.  You could use black headbands but I was keeping it cheap and plus I think the pink adds some cuteness to them anyways.  I used the headbands to make Minnie Mouse ears, which you can see on my birthday girl below.


All I did to make these was to wrap black pipe cleaners around the headband to make a base to glue on an ear shaped piece of black felt.  The pipe cleaner serves as the structure to make your ears stand up.


Here's the shape I used for the felt ears.  I wanted to make sure there was a little bit to cover over the headband on the bottom.


Then all you do it glue it on to the pipe cleaner structure.  Pretty self explanatory.


 Then for the girl headbands I added a cute bow to match Minnie Mouse's bow.  I made them into bows ahead of time and put a tiny dab of hot glue in the middle before tightening to keep them together.  Then all you do is put a big glob of hot glue in between the two ears and hold on the bow until it dries enough. And here you have it:


Lately, because our friends have been having so many birthdays, I have been getting tired of the same old party food: pizza.  So, we opted for a healthier option this time and served Minnie's Clubhouse Sandwiches. The sandwiches had all the fixings out on trays for them to make their own sandwich.  Then we served some disney animal cookies and some chips and carrots on the side.


What's a birthday with cake...or cupcakes that is?!  Here's the cutest and easiest ones to make around.  Buy a bag of regular and a bag of mini oreos and then simply put them in the shape of the mouse's head.  And for added fun you can hot glue small bows onto toothpicks and stick them into the cupcake to make some of them Minnie cupcakes.  I made them half Mickey and half Minnie.  I knew some of the boys wouldn't want anything girlie.


Here's some of our decor that we did.  This one is the gift table.  I just typed out large font on a word document and cut it out and used sticky tac to mount it to the wall.  Just add a few black ears behind one of the letters to make it super cute!


Our entry table had pictures on display of Emma when a baby and now at 2.  I also put the basket of ears on the table for the kiddos to grab when they came in.


Here is the frame that sets out in front of the basket of ears. "Keep Calm and Put Your Ears On".  I saw it on pinterest and I had to recreate it!!


For an activity while the kids were getting here I just found a Minnie and Mickey coloring page online, got the free disney looking font and added "happy birthday Emma" on the coloring page before printing. It's the little touches that make it count.


As you probably saw in some of the pictures I had my birthday girl dressed up like Minnie. She wore her ears I made and then I made a simple Minnie tutu by using a cheap tutu I believe I found at the dollar store that I already had in the closet and I simply sewed on white felt circles for the polka dots. If you don't intend to use the skirt again you could save a little time and just hot glue them on. Here's a better picture of the birthday girl with her skirt.

Hope you found a lot of fun ideas to make your Minnie Mouse Party the biggest hit around!  And who can help but to try on a pair of these cute ears when your kids are napping and you've spent the last hour making a dozen of them:
 

Yup, you're welcome for that! Ha!

God Bless!
Heather Joy

Monday, March 17, 2014

The Luck of The Irish


Well, today being St. Patrick's Day I thought I would share what we did to celebrate here at our house.  We have 'School Day' with our friends on Tuesday mornings and because St. Patrick's Day was coming up, for our Bible lesson we learned about the real Patrick and what he did for God's kingdom.  If you don't know the story about St. Patrick it's pretty exciting: getting captured by Irish pirates as a kid, being a slave for many years, being shipwrecked....and of course sharing the love of God wherever he went.  It's a very entertaining story for kids to hear.

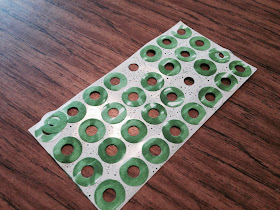
Later in the week we did shamrock paintings using bell peppers, we made some minty shamrock shakes and we also created our shamrock pictures you see below.


These pictures were fun and super easy to make.  I had the girls color with green marker over some sticker hole reinforcers.  Then they used those and put them in clusters of 3 on their paper.  Once they had a cluster they added a stem.  We also talked about most clovers or shamrocks have only 3 leaves but every so often you can find one that has 4 leaves and it's called a lucky shamrock because it doesn't happen very often.  The girl made one 'lucky' shamrock on their pictures.  See if you can find them.


Hope you guys have a great St. Patrick's Day! And don't forget to wear a little green!

God Bless!

Heather Joy

Wednesday, March 12, 2014

Ticket To Ride


Has anyone else been feeling the board gaming love lately?  Well, it's been a slow shift, but my husband and I have slowly become addicted to board gaming.  Am I nerd? I don't think so....but I do realize my coolness factor may have just got shot down with admitting that, but I digress.

So, we stopped to think the other night about how we have slowly switched from watching TV or movies late at night to playing more games (which by the way it way more interactive and healthier for your marriage then just starting at the TV screen)...and we came to this conclusion: Ticket To Ride.

Ticket to Ride was the game that started us wanting to play games at night when the kids are in bed and wanting us to invite other couples over to play with us...ultimately it started our weekly game nights with friends and started our ever increasing love of board gaming.

If you haven't heard of it Ticket To Ride is a very popular game out right now.  It has actually been out for a while, since 2004 to be exact.  It is so good in fact that it won the Spiel des Jahres award for that year.  Of course we didn't have any clue what that Spiel deh..what meant, but we ordered it online looking for something fun that had good reviews.  We didn't realize it would start a new love of gaming in our lives.

The concept of the game is quite simple: draw and place train cards to complete tracks of rail from one city to the next, all the while trying to complete longer destination cards that are from one city to a completely different city somewhere else on the board.  Whatever destination cards you don't complete are negative and the ones you do earn you positive points.  Whoever has the most points at the end wins. Easy right?

Well it gets more complicated when someone lays on you track and then your all of a sudden blocked from your city.
Is there another way around?
Should I just a longer track to earn more points? or should I go the short route before I get cut off?
Should I risk it and take more destination cards??
Ugh! So many choices...
This is what makes the game.


Now that we have been gaming for awhile we have come to gauge a game by the Spiel des Jahres award. This award we have learned is only given to games that 'everybody' could play.  So they are fun and interactive games that are maybe a bit more involved then 'party games' but are still easy enough it doesn't take 3 hours to play like some of the really complex games. So we try to look for this award when we are getting a new game.

Anyways, if you haven't tried out Ticket To Ride you should.  It's even sold at Target now because of it's popularity, although I always buy it on Amazon where it's cheaper.

Happy Board Gaming!
Heather Joy


Wednesday, March 5, 2014

Bible Story Box: Adam and Eve


This is my first attempt at making a Bible Story Box or Godly Play box for my girls' Bible time. I love the idea of Godly Play which is pretty much just using actual objects that the kids can feel and touch to help tell Bible stories. It helps the Bible stories come to life for them and I also love how having these Bible Boxes available to them allows for them to become avid storytellers reenacting the Bible stories themselves, which is just another way of remembering the stories. They say the best way to learn is to teach. So, with this principle I have a day near the end of our weeks bible lesson and have her teach and tell me the story herself.

What you'll need for your Adam and Eve Bible box:
-Adam peg doll
-Eve peg doll
-Angel peg doll
-Trees (one with red fruit painted on it for the tree of the knowledge of good and evil)
-Miniature apples (I used fake holly berries from the craft store and cut one off)
-Fence (I hot glued these fences to popsicle sticks to make them stand)
-Grass fabric or felt
-Serpent (snake or green pipe cleaner in snake shape)
-Animals figurines
-Leaf coverings (tutorial below, after story)


The Story:

Remember when God created the whole earth? He was creating a special place for his most favorite creation: man.


He created a man on the sixth day.  His name was Adam.


God placed Adam in the garden of Eden, which had lots of trees with fruit to eat, water to drink and lots of animals.  Everything was perfect in the garden.  God gave Adam a job in the garden.  His job was to name each of God's created animals and to rule over them (take care of them).


So, Adam saw each of God's creatures and he chose a name for each animal.  What was the name Adam gave this animal? (Hold up an animal) What about this one?... (at this point we put the ocean animals in the water).


Adam enjoyed all the animals but in all the animals God made there was not a suitable companion for him to talk and relate to.  So Adam became lonely.  God saw this and he said, "This is not good that man be alone."  So, God put Adam in a deep sleep.


Then while he was sleeping God took out a rib and made from it a woman: Eve.


Eve was created as a perfect help meet to Adam.  Adam loved Eve and took her as his wife.


Every day Adam & Eve lived in the garden enjoying all it's fruits and splendor and even walking with God in the garden.  But God had given them a rule. One simple rule: "Don't eat from the tree in the middle of the garden.  If you do, you will surely die." (Make sure to point out which tree is the middle tree. Ours has painted red 'fruit' on it although it's hard to see in pictures.)


One day Eve was walking in the garden and a serpent came up to her.


He asked her about the rule and brought doubt in her heart by asking, "Did God really say you must not eat from the fruit?  You won't die."  The serpent said, "It will make you like God."  Well, that sounded pretty good to Eve, so she took a piece of the fruit and ate it.


Then she took a piece to Adam and he ate it too.


 At once, they realized that they were naked!


So, they made some clothes out of leaves to cover themselves. 


Then they heard God.  Instead of walking with him they now hid behind a tree. God called for them.  And they answered and said, 'Here we are Lord."  God asked, "Why are you hiding? Have you eaten from the tree I forbid you not to?"  "Yes, Lord" they answered.


Then Adam blamed Eve, and then Eve blamed the serpent saying he tricked her. Because of their bad decision he told them they could no longer live in the garden of Eden.  They had to leave and from here on out they had to work and struggle to get food and shelter.


And to make sure they wouldn't try to come back in god protected the entrance to the garden with an angel with a flaming sword.


The End


 Now, here is a quick tutorial of how I made the leaf coverings. You'll need your peg dolls and some of the really thin elastic.


 All I did was wrap the elastic really tight around the peg doll...


...Then, pulling really tight because it will be leaving a little extra I sewed it back and forth a ton in my machine.


 Here it is afterwards.  If you have a lot of extra string simply cut off.


 Here I kept doing a few more on the same string of elastic.  It looks cluttered but once I cut them off it will make more sense. 


 Then simply hot glue on a paper leaf of some sort and you have got your leaf coverings. Not exactly perfection but they work for how often we will be using them. Hope you enjoy!


Happy Crafting!
God Bless!

Heather Joy