Showing posts with label Felt. Show all posts
Tuesday, November 26, 2013
Quiet Book #30: Bubble Gum Machine
Here's another quick quiet book page for your toddler book. This bubble gum is for practicing matching skills. The top of the gumball machine opens and the gumballs are stuffed inside. They take them out and match them onto the already visible gumballs.
This page is super easy. Just sew your circles on top of each other.
Make your bottom shape resemble the machine.
Next, cut out three of each colored gumball you want. I used 8 total. Make sure to make sure they actually fit inside of your gumball machine before you glue anything!
Then glue together two of the circles of each color. This thicker one will be the one that gets stuffed inside the pocket. It will hold up better to being played with.
Then just set out all the gumballs on top of your white circle and use felt glue to glue them on. Don't sew here! Otherwise, you want have room behind your circle for a pocket to hold the gumballs.
Then sew on your pieces to your page. Make sure to leave a gap on the top for your opening to store your gumballs!! I forgot and had to seam rip one of mine...the next two I made I remembered. :)
Happy Crafting and God Bless!
Heather Joy
Tuesday, October 1, 2013
Quiet Book #27: Spider Web Halloween Page
Well, my attempt in this quiet book page was to have a Halloween themed page that wasn't spooky or scary, since we don't celebrate Halloween with all that gory stuff. Spiders are not 'scary' to us because I don't want to instill a spirit of fear in my children, rather they are 'creepy'. I'm always careful to not say any things scary and always tell them that "The Lord hath not given us a spirit of fear, but of power and of love and of a sound mind" 2 Timothy 1:7. Anyways, on to our 'creepy' spiderweb page.
Start by making the spider out of two circles of black felt and small Rick rac for the legs. Glue on the legs and ribbon the spider will hang from. Sew together and stuff it just before closing it up all the way to give it a little bit of dimension.
Next, you need to work on the web. Start with a lacing string. Make a spiral around the page. Then cut long rectangles which will be where the web gets weaves into. It will also help give it points to make sure it looks web like.
Pin in between the lacing string and sew down.
Here's what the web supports should look like all sewn down.
Here's what it looks like when you weave the 'web':
Then just sew on the spider at the top of the page and here's the final result, just in time for Halloween!
Start by making the spider out of two circles of black felt and small Rick rac for the legs. Glue on the legs and ribbon the spider will hang from. Sew together and stuff it just before closing it up all the way to give it a little bit of dimension.
Next, you need to work on the web. Start with a lacing string. Make a spiral around the page. Then cut long rectangles which will be where the web gets weaves into. It will also help give it points to make sure it looks web like.
Pin in between the lacing string and sew down.
Here's what the web supports should look like all sewn down.
Here's what it looks like when you weave the 'web':
Friday, September 20, 2013
Quiet Book #26: Smores & Campfire
Here is another quiet book installment for you. This is the S'mores part of our camping pages. You can see it goes along with the camping tent page, which I will post later. This is a fun page because you can really toast the marshmallow over a standing up fire.
And then make a delicious s'mores with it.
Here were the plans I started making along the way. I originally wanted to make a tent and sleeping bag on the same page as the fire but things always seem to change as I start going along.
Here's most of the items you'll need:
-brown felt (for chocolate and stick)
-red felt for s'mores box
-yellow and orange colors for fire
-tan for firewood, graham crackers and toasted part on marshmallow
-white for marshmallow
Start by gluing all the tedious rectangles on your bar of chocolate and the flames for your fire.
Here I sewed together the tan graham crackers as well as the toasted part on the marshmallow.
Make sure to leave the other side of the marshmallow white ( I actually forgot to switch my bobbin and so the thread is tan on the back. oops, showing a little bit of my laziness to switch out my bobbin). But the point is you want one side white and one side toasted so after you put it on the fire you can switch it.
Next, start on the stick. I found a nice shape and then I traced it onto cardboard from an old cereal pizza box. You don't want it too flimsy.
Trace the same shape onto the brown felt, twice. Grab out your glue again and glue it together with a felt piece on the front as well as the back.
Then start working on the bag for your s'mores stuff by cutting out the rectangle to size and I added a triangle piece on each size so that way it would have more depth to hold all the fixings inside:
A couple pictures of me making it along the way:
I sewed the triangle sides onto what will be the front of the bag.
Here's a picture of how much space that added to my bag. You don't have to choose to do this you could always come up with a zipper pouch or something else to store your s'mores fixings into.
Then add the handle underneath the top edge of the bag.
I'm missing some pictures of the rest but you'll need to:
-add a pocket for the stick
-stitch down some firewood pieces
-sew down just the bottom edge of each flame so they can stand up like a real fire, like so:
-add velcro to the marshmallows on both sides so you can flip back and forth. You can see it a little in this picture on one side of the marshmallow
And once you've spent about forever making all this happen you will be super excited to show your kiddos all your hard work, and maybe even plan a family camping trip to reveal this page on your trip.
Happy crafting and God Bless!
Heather Joy
Friday, September 6, 2013
Quiet Book #25: 'Five Green And Speckled Frogs'
Here another quiet book page idea for you. I came across these free adorable frog printable and HAD to make a page for them. If you've grown up never having sung 'Five Green and Speckled Frogs' you have sorely missed out! My girls LOVE the song and it's a relatively easy page to do so, I jumped on it! Get it...jump, like a frog..okay, moving on.
I didn't take picture on this one again, since it's been awhile since I made it. But all you need to do is make a log (large enough to fit all five of your frogs) and a pond (be sure to leave the top open for the frog storage). Then use the tutorial on how to make your own custom printed felt to make the frog figures and the poem. I just typed the poem up in word and printed it like in the tutorial. After that all you have to do is sew it all together.
Heather Joy
Friday, August 16, 2013
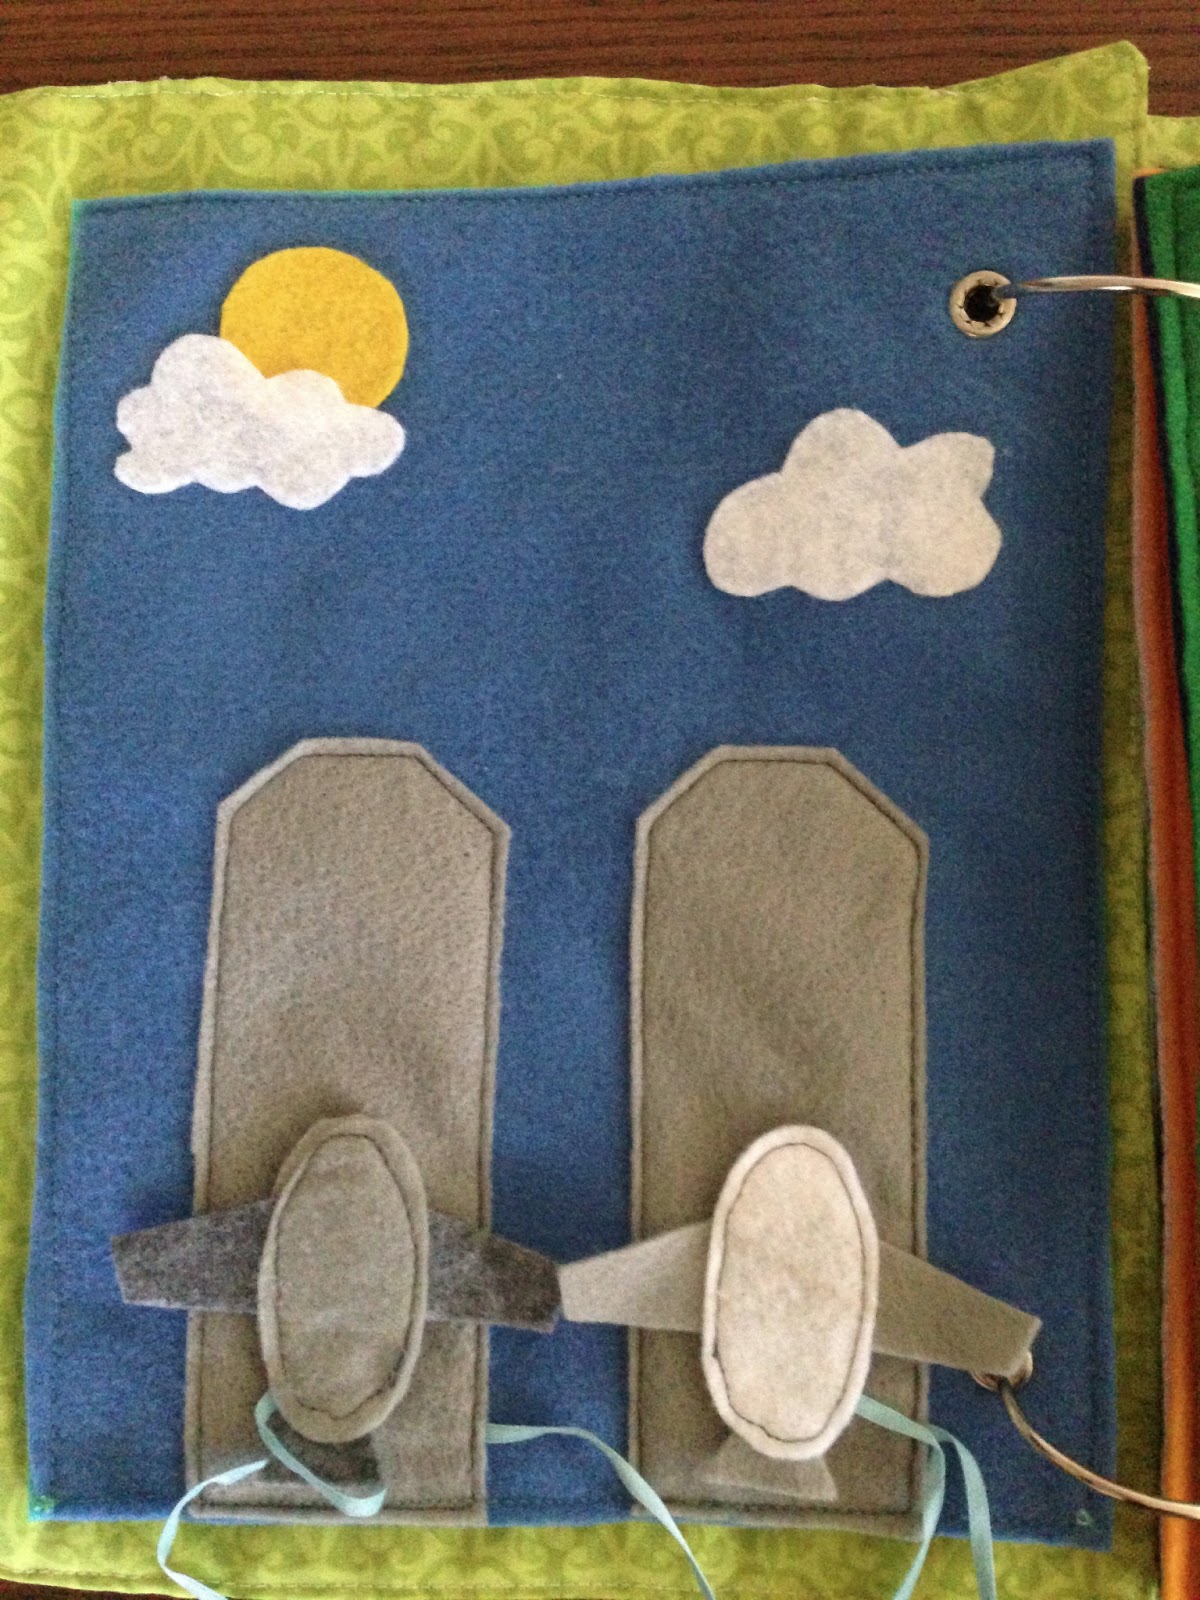
Quiet Book #24: Airport
Here's just a quick picture of our airport page. There aren't as many boy friendly pages out there but this is an easy one. It's also fun for a toddler quiet book as it doesn't require a lot of fine motor skills, like buttoning, zipping etc.
There's not much to it and I didn't really take pictures along the way but you can figure out by looking at the picture. The trick is making the ribbons not too short or too long because you don't want them tangled easily but you also want them to be fun to 'fly'.
Well, until next time I guess.
Happy Crafting and God Bless!
Heather Joy
Friday, August 2, 2013
Quiet Book #23: Purse
I just cut out fabric the shape I wanted and did a really tight zig zag stitch around the whole thing. First I did the back piece of the purse, next the top piece and then finally I stitched on the top the opening piece. Don't forget to put the handle underneath before you sew on everything else. I left it up and just put some velcro so she could pretend she was holding it. It's pretty flimsy being only fabric but she still likes it.
Then stuff it with goodies that every girl needs in her purse: chapstick, a key (one side has a picture of a house, the other side a car), a mirror and a bible book.
Happy crafting and God Bless!
Heather Joy
Friday, July 26, 2013
Quiet Book #22: Flower Vase
I had seen a bunch of different flower pages for quiet books. I've even
made one of the button flower pages before, but I was wanting to make
something a bit more interactive, especially for the little ones because
buttons can be so hard. So, here is what I came up with:

I just made a vase shape out of fabric, glued on a ribbon for fun and zig zagged around it all the way.
Then I just needed to make the flowers. I cut out a lot of flower shapes, yellow circles and green leafs out of felt. Then here you can see me putting them together. I started by sewing on the yellow circles on half of the flowers. Then I glued the pipe cleaner on the plain flower shape. I also added a dot and glued on the top part of the flower- just in the middle. I later sewed around the whole thing, so it still had that homemade look to it.
Then took my green leaf shape and put glue on the middle and put it on the pipe cleaner.
After that was dry, I added some more glue on the longer portion of the leaf and held that together until dry.
Here are all the flowers in their beautiful glory. I was making three pages worth.
And here is the final page. A cute little page, right? Well, I was happy with how it turned out!
Happy Crafting and God Bless!
Heather Joy
Wednesday, July 3, 2013
Quiet Book #21: Warm Mittens
This was a very simple quiet book page. The mittens are intended for a toddler or a baby.
I just started by cutting out my mitten shapes. I added a colored band just for looks. Then I cut a fleece shape just slightly smaller that I sewed underneath.
Then, you just pin your mittens on the top. I didn't sew down on the colored band because I wanted the opening to be really easy to get their hands in, so I only sewed on the purple part.
And there you have it. A super easy mittens page. This would be great for a winter quiet book or just a baby's book.
Happy Crafting and God Bless!
Heather Joy
Subscribe to:
Posts (Atom)