Sunday, September 2, 2012

Quiet Book #11: Button Flowers

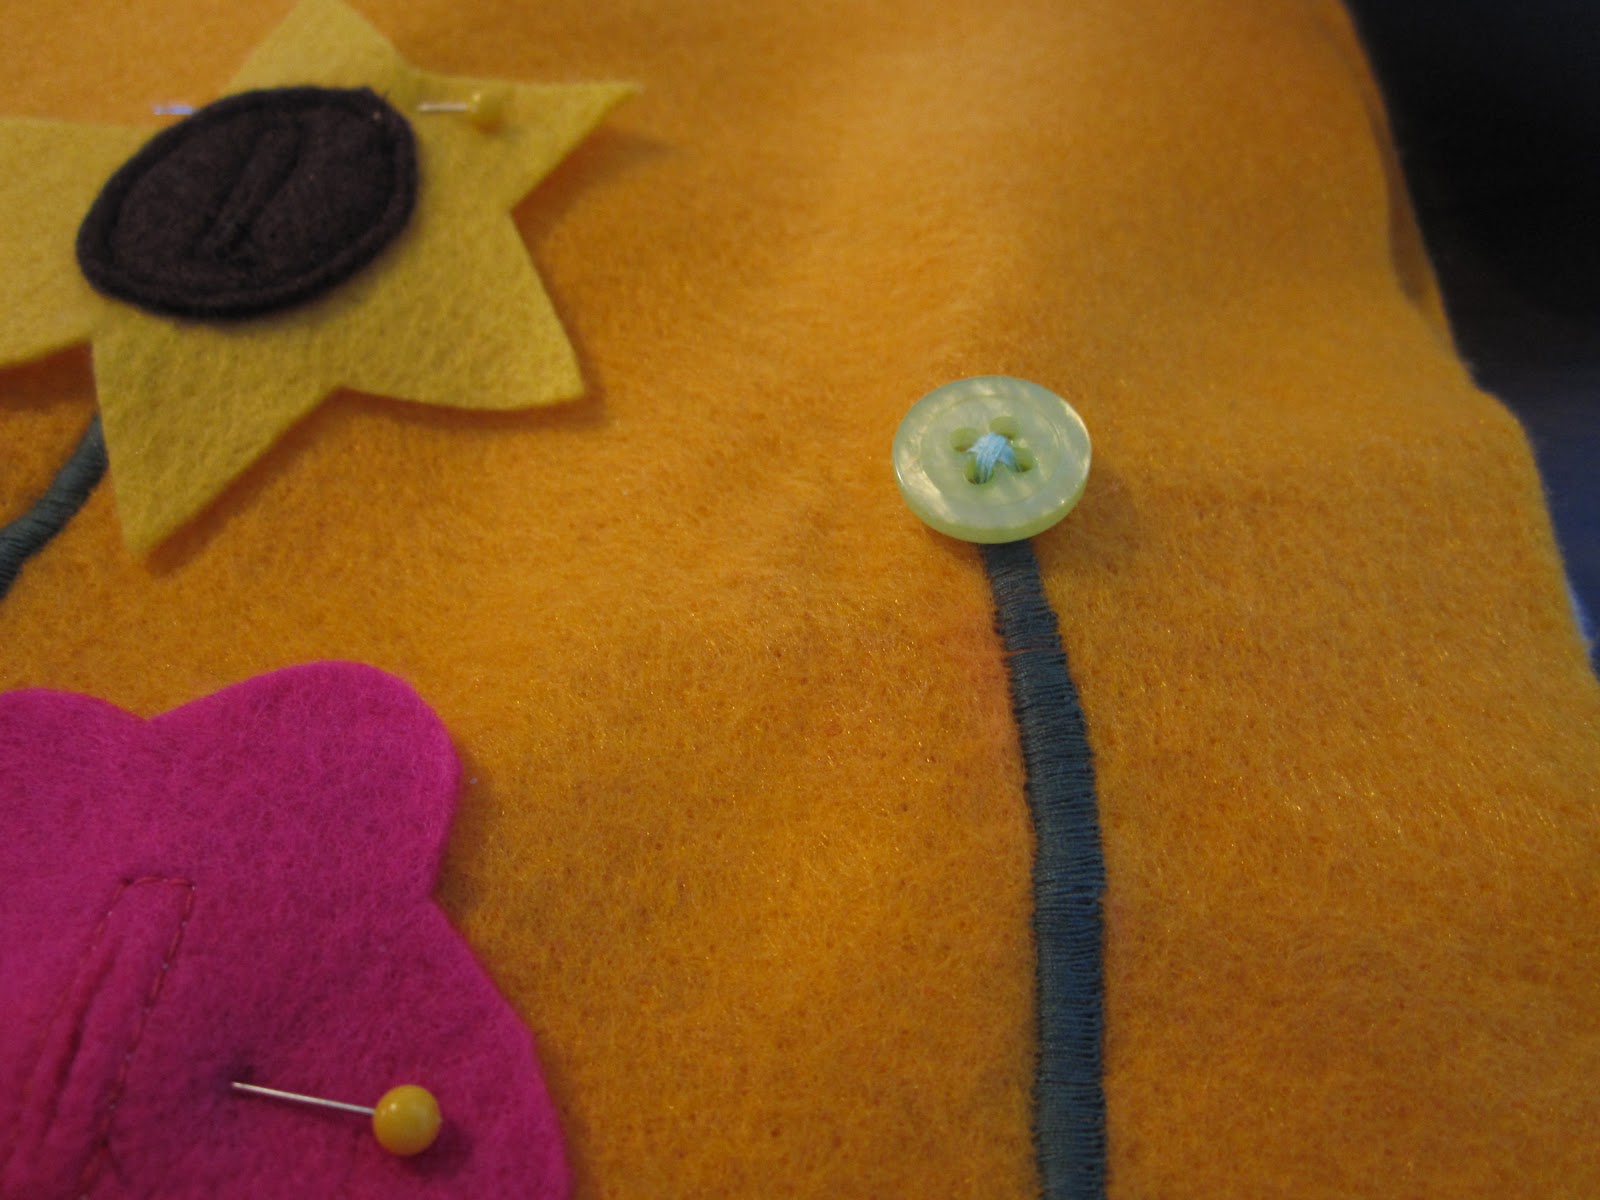
Here is the 11th page in my quiet book adventure.  I'm on a mission to make a memorable book for Kara (and eventually Emma) that they can cherish for a lifetime.  I remember how much fun I had with my bible quiet books as a kid and now I can appreciate my mom's hard work making them!  For this page first cut out whatever kinds of flower shapes you want: Tulip, Daisy, etc.  Then as you can see in the photo below, you need to sew on the middle, and sew a long rectangular box (size it by the button you plan to use) , then cut a line in the middle.  This will become your button hole.


Pin where you want the flowers placed on the page. Then I removed one at a time. Marked where the middle of the flower was with a piece of pink chalk, just enough to see it.  Then I just started at the bottom line which I was going to add grass on at the end and started a zig zag stitch at the widest width on my sewing machine.  I set it so it wouldn't even move it.  So, as it stitched once I felt it was think enough I would slowly move it along.  I stitched all the way up to the top where I placed my chalk mark.  Try to add some bend into it.  You don't want it to be so straight and unrealistic.


Sew on a button (make sure you check that it fits through the hole you made!!) I made sure to use buttons that were all of similar sizes so the flowers could easily be interchanged.

Last, cut out a piece of grass felt and sew it on, covering up all the end of your flower stems, making it look so clean and nice.  I decided to just stitch a rectangle on the bottom of the grass that way the girls could make the grass stand up.  Kind of fun I guess, maybe not.  Either way it adds just another little element to the page.


And here you have it, another beautiful page of flowers that interchange.  A great task for building up those fine motor skills.  Note: you can make the holes smaller on flowers making it more difficult for the older kids, or larger and easier for the toddlers. Have fun and God Bless!


Thursday, July 12, 2012

Kitchen Tower

So, am I the only mom who has realized it's hard being pregnant and holding a toddler up to wash their hands in the sink?!  I never realized but I held her on my stomach while I helped rinse off her hands.  And with my belly growing bigger by the day this was not going to cut if for long.  So, 'a researching we go, a researching we go'...(sing with me).

I looked up the safest kind of step stool and realized their really isn't a safe kind of step stool.  They all have the potential of my child stepping to the side or back and falling and cracking her head open (yes, I'm a worst case scenario kind of person). Even ones with the handle bars on the sides didn't give me enough peace, and that's when I found......the kitchen tower.  

Some brands call them the learning tower, some the kitchen tower, but really it's just a 'help mama' tower.  These are towers designed to keep the child at counter heights, without the risk of them falling back.  I love them!!  But I did NOT love the price tag!  Saving for baby number 2, so 'a researching we go, a researching we go'....(come on, you know your humming it).  I ended up finding this amazing blog, which had a pattern to follow!!  They are so generous to give away the design for free and I always give credit where credit is due, so a big shout out to Ohdeedoh.  

My husband went and bought the tools he needed (an investment for my growing list of things for him to build, now that's he's proved himself with this tower, lol) and the supplies.  Two days later, here Kara is dancing inside of it while Daddy is finishing up sanding it down.


I still haven't decided what color I'm going to paint it, but all the same, it works!!  It's awesome and now Kara is not only washing her hand by herself, she is helping mommy clean dishes and prepare lunch and dinner.


A couple things to mention about the design: Yes, this tower is HUGE!  It ended up even bigger than what I thought, but since our kitchen is pretty big to begin with it doesn't bother me in the slightest, but this is something to be aware of before you get started. Also, we added some foot gliders on the bottom, so we can slide it in and out of the way really easy.  We also added an extra height option to it.  The pattern showed 3 but I didn't think she'd grow in such huge spurts, so we spaced out and added another.  But didn't think about the fact that it would block the step holes when it was in the 2nd to highest position.  See what I mean: okay the image doesn't show it the best but the flat square cuts through the foot hole on top.


But really it doesn't matter to us because our Kara doesn't even use the foot holes, she just climbs over  the side.  So, I wonder if the steps are even necessary?  I'm also thinking of adding a dry erase board to the back side, just so she won't fall back accidentally and for extra fun in the kitchen.  I'll post pictures once we ever do that.  

Quiet Book #9: Dog House

This quiet book page I am really excited about.  This is going to be a dog house page, which will have a few different breeds of dogs she can choose from to put in the dog house, feed him his food or give him his bone when he does tricks.

Here's the pieces to get you started: green grass, bone (2), dog dish, food, dog house, triangle roof, dog house door, a box and lid for storing dogs and a piece of ribbon (not shown).


First, I started cutting the grass.  I didn't want to spend too much time but I thought a little effort would make it more cute than just a rectangle patch of grass.  I cut the green the height I wanted it on the page, leaving tags sticking out every so often.  Then I simply went back in and snipped the tabs at angles and this is what I came out with:


See the difference?

Next, you need to prepare the bone.  First, I glued on the ribbon to one side of the bone. Let it dry completely.  Went back and sewed the matching bone on top.


Then you just start sewing everything on the page.  First the grass, then place out the dog house, dish and storage box.  Make sure you have everything in place where you like it. Pin it.  Then place the ribbon under the right side of the dog house and sew over it as you sew on the dog house (actually I think I even glued it ahead of time a little bit just for added reinforcement).  Next sew on the door and roof to the house.


Next, glue the dog food into the dish using your felt glue. (once again I'm making 3 matching pages instead of just one, that's why you see 3 dishes. You only need 1 unless your dogs are extra hungry)


For added dimension I only sewed on the dish and not the food, so they can lift it up so it's kind of 3D because I figure they won't always hold their dog flat on the page.


Then, you need to sew on the box.  Just sew the bottom and edges of the rectangle. Leave a gap for the lid and sew that in place on the top.  No button needed here because there won't be any small parts.  I'm going to only make 3 dogs I believe.  Haven't made them yet but I'll post that when I get it done.  So, much to do before Kara's 3rd birthday.  I'd love to have these pages done and bound for her gift. Pray for me :)


Here's the final page: (with added felt doggies and tennis ball- post to follow on this new awesome way to add more detail to your quiet book)


Happy crafting!

Wednesday, September 7, 2011

Quiet Book #8: Ice Cream Cones

This page is in honor of my obsession with ice cream and if Kara is going to be anything like me, which she's already showing signs of it, she will be in love with it too.  The concept is to have two ice cream cones for two people to make patterns, or for mom (me) to do one cone and her to make her's match.  So it can be a game for one person or two.

Here's all the bits and pieces you will need to make one yourself:

Note: There's actually 2 cones, you just can't see it very well.

The ice cream is stored in a carton.  Which I made from white, with light blue stripes and then an oval circle, which I'm going to later iron on the words 'ice cream' or something.  First I cut out the ice cream carton shape then just cut strips of blue.  Spaced them out, trimmed the tops and bottoms and sewed them on.


Sewed on the white oval onto the pink larger oval, which is the label on the carton. Then sewed it on the carton itself.


Then all that's needed for this one is to place the ice cream cones and carton in place and sew them all on (make sure to not sew the carton opening).  The last thing is to fill the carton with the ice cream. (I ended up making way too many scoops for my tiny carton. Next time I would have made smaller scoops/cones or a larger carton.) After you fill the carton with your scoops you can now place out where the lid needs to be to cover the opening of the carton. Sew it on and you're done!


Happy crafting!

Quiet Book #7: Number Matching

For the next page in Kara's quiet book I wanted something to help her practice her numbers as she gets older.  So, I just made a number matching page.  I didn't want any loud velcro during church, but with it all being felt it sticks together just fine without.  I found a simple pattern at, I don't know where (I'll keep looking because I want to give credit to the right person) and copied the pattern for the numbers.

You will need 3 cutouts of each number.  Two will be sewn together back to back and one will be sewn onto the page.  I used a fun, variety of colors just because I felt like it.  


I also created a back page that has a giant pocket to hold all the numbers.  I made it simply by cutting a square and opening flap.  Cut a hole for the button on the flap.  Sew the button on the square.  Then sew on the top flap, then the bottom and sides of the square. Here are some quick picks on how I made that:


Here's the final product: (Sorry, it wouldn't flip for me)


Felt Carrot

Here's another felt food item from Kara's pantry.  I'm trying to stick to the healthy foods...at least for the moment, so here's a carrot.  Sorry, for the lack of pictures on this one.  I got distracted with the little one.


This is super easy though.  Just cut out a large triangle the size you want your carrot to be, adding a half inch for seam allowance.

Sew lines in a slightly lighter or darker orange color than the carrot.  So the lines should go horizontal up the carrot, starting from the tip and going up to the largest part.  I think I ended up putting 4 or 5 lines.  Then line up the edges of the carrot, sew together and then turn inside out.


Next you cut out a little greenery for the top.  Double it up and sew together.


Stuff your carrot full of polyester filling.  Then bust out your needle and thread.  Thread in and out all the way around your carrot top, then pull in closed while sticking the greenery there.  Then slowly but surely attach the greenery by going back and forth through the carrot top and greenery.  Pull in tightly closed as you go, so you won't lose any of the filling from curious fingers.

Then finish your thread off and your carrots all set to go.


Yes, I rocked out this carrot while Kara and I were both still in our pajamas.  Did I say I love being a stay-at-home mom yet today?!  Because I do!!  And yes, those are batman pajamas :)  I know you're jealous.

Happy crafting!

Sex Party: a.k.a. Gender Reveal Party

Don't get worried folks, it's not that kind of party!  We thought it would be fun to make a surprise out of the revealing of our baby's sex.  And what's funnier than passing out 'Sex Party' invitations to all of your friends at church?! LOL So, I designed some invitations, which can be purchased here if you're interested from my Etsy Shop.


So, here's how this worked.  Ryan and I went to get my ultrasound and told the technician that we do not want to know what the sex is but we want her to put it in a sealed envelope.  I let her know we were having a party tomorrow to announce and that family was coming in and everything.  She said 'That's a lot of pressure'. So, she did her thing and showed us the baby's legs were closed from ankle all the way up!  NO!  She kept trying.  I told her this was our one time shot because our insurance only pays out for one ultrasound.  She kept trying.  She finally had me roll onto one side...no go.  Then I rolled onto the other side.....'alright we're done', she said.  I asked her how certain and she said she couldn't give me a percentage but she wrote down on the image what she thinks it is.  They sealed it in the envelope and handed it to us with some other pictures we were allowed to look at.

We drove to my awesome friend Heather Harrison's work and passed off the envelope to her.  Then we went home and waited.  We wouldn't have the party until the next night.  I have to admit it was harder than I thought it would be just knowing that she knew what our baby was going to be, when I'm the one carrying it!!

Anyways, so we get all the food and decorations prepped.


We asked everyone to dress in either pink or blue to cast their vote for the baby.  Here's the PINK team:


And here's the BLUE team:


The night of the party. The cake arrives courtesy of The Harrison's:


Then Ryan and I cut the cake at the same time so as not to reveal any crumbs coming up through the first cut, lol.  So, what is our baby??????


YUP!!!  ANOTHER GIRL!!!  YAY!  Kara is going to be the best big sister around!  The frosting color in the middle is what revealed the sex of the baby.  Here's another look:


We are so excited to be having another girl. :)
And to the winners.....a little 'he, she bar', which for some reason I don't have a picture of, but I colored in permanent marker the 'HE' on the hershey candy bar label blue and the 'SHE' on the label pink.  They turned out really cute and they would work for whatever sex the baby ended up being :)

Here's the victory shot of the pink team, with the poor, losing blue team, LOL.


Thank you all who came to help us celebrate the apparatus that our baby has been growing!  We are so thankful for such wonderful friends and family for being a part of our lives!!

Heather Joy

*Don't forget to buy the invitation design here, so you can have your very own gender reveal party!