Friday, February 13, 2015

Day Trip: LBJ National Park in Johnson City, Texas

For memorial weekend my husband had off work, so we decided to do some kind of day trip with the girls.  We decided to go up to Johnson City in Texas, which is just about an hour North of us. We've heard about how they have great Christmas lights but have never made it there yet.  So, with a few clouds in the sky we commenced our trip.


What we didn't expect was a torrential downpour!! Yikes! We almost pulled over a few times because it was so bad, but my oldest daughter had to use the restroom...so we just drove pretty slow through it all in search of the next bathroom.  We finally made it into town, however and made our first stop at the Lyndon B. Johnson Visitor Center (I believe that's what it's called. It kind of gets confusing because there's actually two separate parks for LBJ).

Inside, there was a park ranger and we were able to ask what we could do still considering we've never been and with the weather being like it was. She gladly assisted us and gave us a map with lots of options. Inside the building was also a small museum display on the life of Lydon B. Johnson.  It was done very nicely and we were able to walk around for a bit with the girls. They listened on the handhelds to some of his talks and speeches, which was fun for them to go around picking them up.  Not really any hands on stuff for kids, but since it was our first stop in an hour the girls had lost of fun anyways. The gift shop was fun to look at too.

From there we drove just to the next corner over and were able to go into the boyhood home of LBJ. He wasn't born there but it was where he grew up during most of his childhood. The house was all set up nicely, like the time period it was from. The girls enjoyed looking at each of the rooms. There was a ranger there giving brief talks about the house. She was actually leaving for lunch but she let us just walk through for a moment before she locked it up.  So be sure to check times for that.


Parental note: there was a weird picture in the parlor that looked like a scull that was hanging up on the mantel. I'm very careful about what my little girls see (don't want nightmares), so I kind of distracted them and then quickly led them back to the kitchen. My husband inquired about it and was told it was actually a painting that LBJ's mom used as a teaching lesson because it looks like a scull but if you looked at it carefully it actually looked like a lady looking in a mirror. So, her lesson was to her kids that 'things aren't always as they first appear'.

We wish we could have stayed and done the walking trail that went to a couple more places near the visitor's center but with the weather still raining on us we decided to drive the 13 miles further down that road to the actually LBJ National Park, which was his family's ranch. When you get there you have to check in at the building to get a free permit that lets you drive through the rest of the park.

This is the building where you get your permit. It's free. They just want to keep track of how many visitors are coming through.


We took a quick break in the car while it rained a bit more and ate lunch in the back of the van.


When we got our permit we were gonna head out but noticed some more buildings in the back of the permit station and so we took a quick peek. And I'm so glad we did! There was a fun museum back there on the German immigrants that came to Texas and how just the different things they ran into moving out to Texas. There were a lot more hands on kids stuff here, so we spent quite a bit of time! My girls got to pretend to churn butter and put together some different meals (Mexican, Texan, German...etc) and they got to get the mail from the post office with letter that the German's were writing home about their new life in Texas. So many great teaching moments here!


Then after the girls splashed in a few more rain puddles...
 ...we headed off to the Sauer Beckmann Living History Farm. The rain had stopped just in time! We parked and then walked into the farm (be sure to close the gate so the animals don't sneak out). This farm was actually a neighboring farm to LBJ's family and is still up and running. They call it a living farm because they have people hired who come and actually live on the farm and operate it as if it were 1912, which would have been the time period of LBJ growing up. It is so neat out there. You can just explore all the buildings (be sure to watch your little ones in the barn because it is a working farm and lots of tools are out). We saw hogs, turkeys, chickens, cows, and a bull.


We also saw that they have a garden, which is where they grow their food.

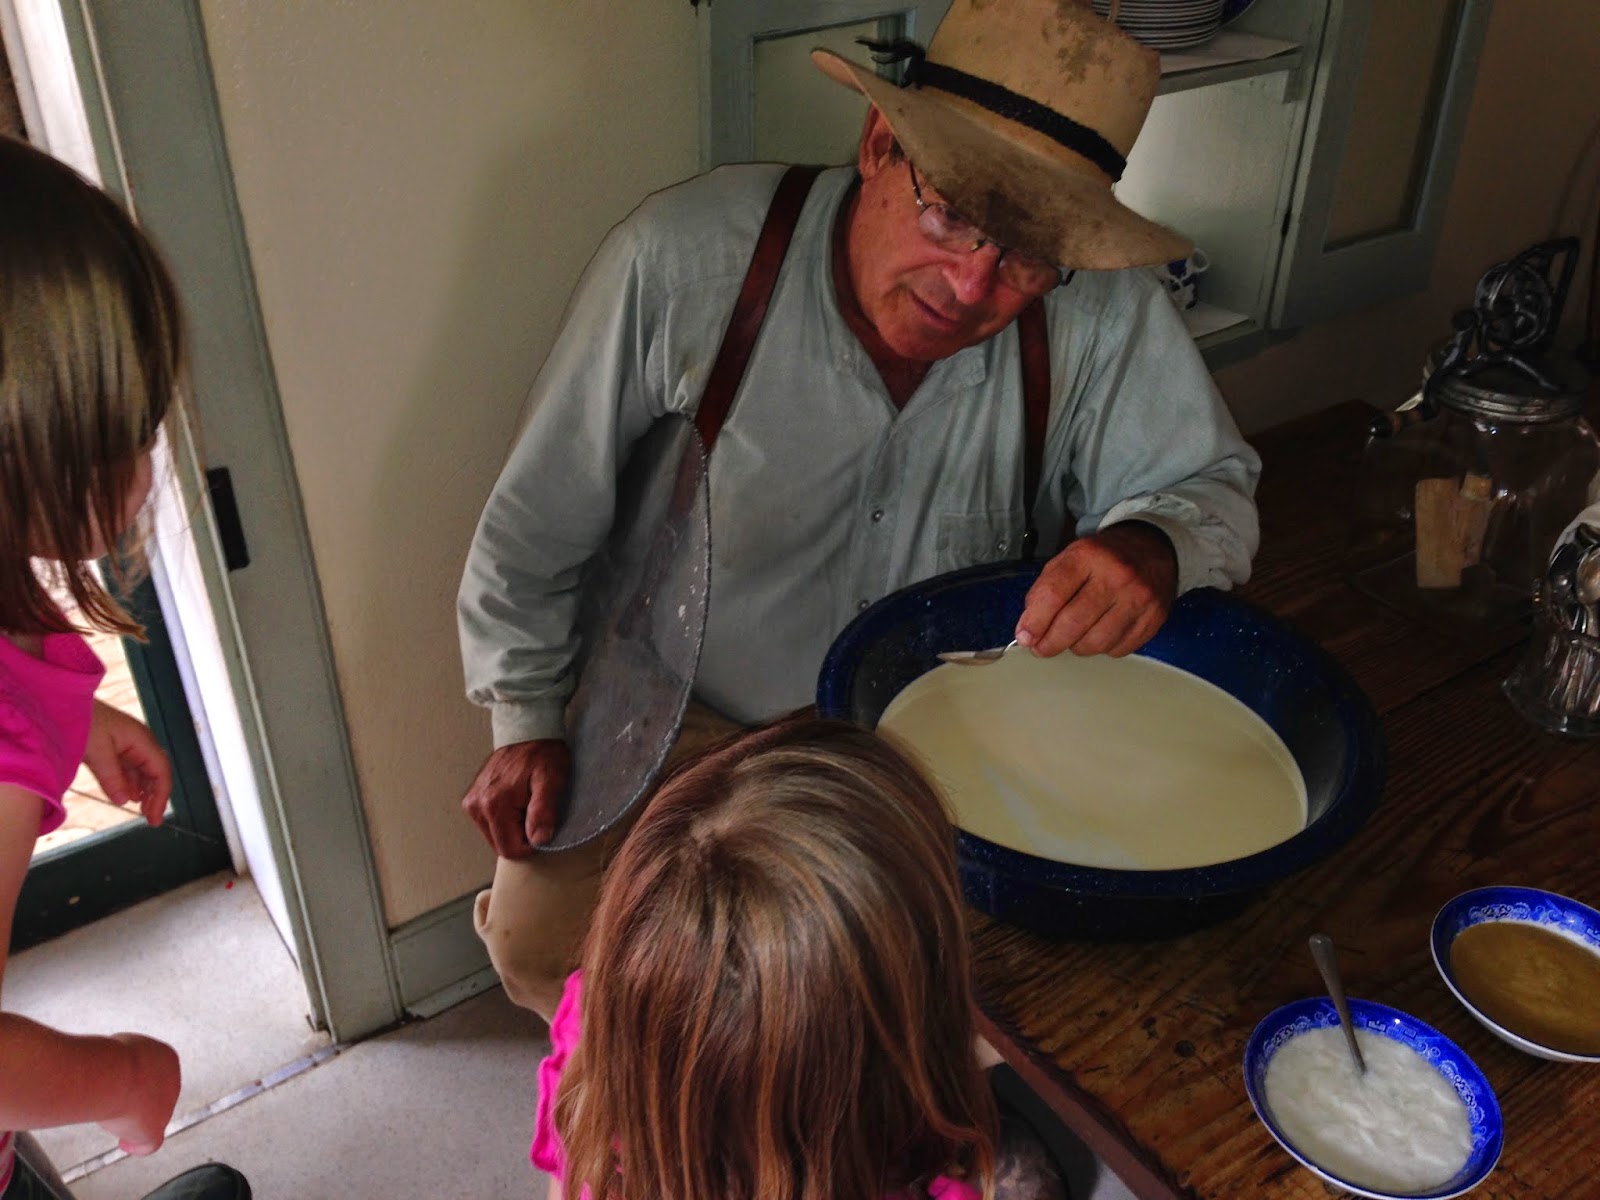
So, during the day there will be people there operating the farm as if it's theirs. We ran into this gentlemen there and he was so kind to show us around. He explained that they eat, and work on the farm from 9:00am-4:30pm but then get to go home and live like you or I. So, when they're there they are making soap, canning, milking the cow, tending the garden, feeding the animals, and storing their food, doing laundry, mending clothes, and he said they even do butcherings on occasion. And they do it all using only equipment that would have been available back in 1912. It's amazing to see how they preserve their food in big tubs of lard -for up to 16 months!!

He also taught us about what they do with the milk and how they can make butter with the cream or let it set and make clabored milk (yogurt) or they can let it sour and then strain and make it into cottage cheese.

Above is their cream separator machine they used in the early 1900's to separate the creme from the top of the milk. He demonstrated how you'd put it in and then crank the handle and it would pretty much work like a centrifuge and spin and the cream rises up to the top and comes out one spot and the regular milk comes out the bottom spout. So cool! Didn't realize they used tools like this back then.

They also have a hand grain mill for making corn meal. He showed us their wood burning stove and the leftover from their breakfast on there. Ha!  It was so neat!! You can walk into any building and just explore!


If you're planning to go, something to keep in mind is that they don't do demonstrations. So, it's not like they have soap making class at 3pm. He said that they just do what they need to do when they have time to do it...like a real working farm would. He did recommend however, that they usually do the milking early in the morning when they first get there. So, be sure to get there early if you want to see that.

If you drive just past the farm there are a bunch of picnic tables and some swing sets for packing a lunch! (Wish we would have known that, then we could have skipped our picnic in the car.) The bathrooms are also there and were kept very clean when we went, which is always a plus!

After the farm we went off to do the driving tour of the LBJ ranch. Yes, ANOTHER different part of the LBJ park.When you drive through there are a handful of numbered spots on the tour that you are able to get out of your vehicle and go into the building or walk around the area depending on the stop.

The first stop was the school of LBJ. It is an old one room school building that he attended when he was 4 years old. They also have an audio recording which explains a little bit about the Presidents history with this building.  Nothing hands on, so a quick stop for us and our girls.


We skipped a couple stops because of time and our girls but there are a few stops besides the schoolhouse where you can get out and look around, like the family cemetery where the President and the First Lady are buried.

We kept driving on the ranch to go to the next stop.  What I found really cool was that cattle were just grazing on the grass all around you. So, watch when you're driving. The ranch is still completely operational. And as we kept driving along the road there were some signs that would give us some more information about the president and his family and more cattle...and more signs...and more cattle!  The girls enjoyed the drive.

There was a stall area that you could get out at and they told us that sometimes they'll have a big bull down there so people can see them up close...but as we drove by we didn't see any animals in the stall so we stayed in the car and continued on to the Texas White House.

When you complete the long loop that goes around the ranch property and around the airstrip mainly, you will come to what they call the Texas White House.  No, it's not a replica of the white house, but it is the ranch home of LBJ when he was president. He spent some 500+ days at this house when he was president and so it earned the nickname of the Texas White House.  You can choose to pay a $3 fee for each adult (18 and over) for a tour of the house but there was plenty for us to do free and we could tell the girls were running a bit on empty and didn't want to push it.

Instead, we walked over and saw the air force one plane that few him from the Lackland Air Force Base to his home.


Then we got to go into the hanger which is not a museum. There was lots of information in there. Not very hands on but we walked through quick enough to keep the girls' attention. We liked his hydrocar, and how it said that LBJ had a great sense of humor and would trick his passengers that the brakes went out as they careened for the water.....just to surprise them when the car kept right on going, floating on the water. My oldest thought that was funny.


After the hanger we called it a day.  We had so much fun and couldn't believe how much stuff was up in Johnson City that we didn't know about! And there is still so much we didn't do!! Also, if you didn't put it together: Johnson City is actually named not for LBJ himself, but it was named for one of his older relatives. Cool! I just never thought of it!  Anyways, I hope you take the chance to drive up to Johnson City and see all the cool museums and stuff at the LBJ National Park and visitors center.


Supposedly there are tennis courts and a pool too! We didn't see them but will let you know if we go explore those.

Happy Texas Trekking!!
Heather Joy

Wednesday, October 15, 2014

Day Trip: Mount Bonnell in Austin, Texas

A few weeks back we went up for the afternoon to Austin to see my sister-in-law and her husband. We told them we wanted to check out Mount Bonnell.  So, we planned to meet there. We ended up getting their early so since we saw a sign for some kind of natural preserve on the way we decided to check it out for a brief second before they would meet us.  I made another post about the Mayfield Natural Preserve here. It's an operating event center that just has wild peacocks walking around!! Yes, I said peacocks!  It's totally worth checking out and I would hit them both up the same day if you're in the are since they are practically just down the street from each other.

We hung out there for awhile, just until our family was close...but back to Mount Bonnell.  When the family got there:


...we did the stair master all the way to the top.  Yes, all it is is a bunch of stairs to the top of this mountain.  It took us maybe 4 minutes to get to the top. Really quick and easy. But once you get to the top the view is awesome!! For such a short little climb you can see around the whole city of Austin!  It's gorgeous.

The mountain is set right on the edge of the Lake Austin portion of the Colorado River.  So you can see the river running a Loooooonnngggg way down below you.  Actually we read the little plaque that's at the food of the mountain and it explained that way back when there was a PR stunt pretty much and some lady made a zip line and jumped off Mount Bonnell and went all the way across the Colorado River to the other shore.  Just a fun fact to tell your kids when they're looking down that huge mountain at the water, ha!


Anyways, there are some picnic tables up at the top so feel free to pack a lunch for the family. Although, we went on a Saturday and it was pretty busy and no tables were unoccupied. Wonder if during the week would be less crowded. We came just before sunset so maybe that's why it was so busy.


So, the next time your in Austin take a quick set of stairs up Mount Bonnell for a terrific viewpoint!!
And don't forget to check out the Mayfield Nature Preserve just down the street.

Happy Texan Trekking!
Heather Joy

Wednesday, September 17, 2014

Day Trip: Mayfield Nature Preserve in Austin, Texas


So we were actually heading to Austin to meet up with my sister-in-law and her new husband at Mount Bonnell, but our family wasn't as close as we were so we had some time to kill.  We saw a sign for Mayfield Nature Preserve right down the street. We thought we'd check it out. 

What?!  Is that a peacock running around? Wait?! Is that a group of peacocks? Where am I? This can't be Austin, Texas, but yes it actually is!


This place is so cute and quaint. We didn't have a whole lot of time to explore but what we did find out is that Mayfield Park includes a historic cottage that operates as an event center, so you can rent the cottage out for private events or weddings.

There is also a 2 acre sized garden that has ponds, water lilies, beautiful flowers and the peacocks that just roam around the area.


There is also the 21 acres which makes up the rest of the preserve and it surrounds the park and contains walking trails and wildlife habitat.  We only went on the short loop trail because of time but it was very easy walking for my girls, although there are some steps along the way, so not completely flat and there were some rocks and roots that they had to maneuver over but overall a pretty easy walk. We could have used our off road stroller with no problem if we wanted too.  But the walk was so short anyways that we didn't really even need it.


We have plans to go back when some of my family comes out to explore more of the trails and let my children try to catch the peacocks again, lol.  Okay, not really, but if you move really slow and you're in the right place you can catch a brush of the male peacocks tail like I did.

We also go to see one of the males put up his tail feathers. I've never seen the backside. It was really cool. We saw how the larger feathers in back are what push up the decorative feathers on top. A great homeschool lesson to add to our adventures.


One family matter note: there is only a porta potty for restrooms. And it wasn't very clean and no soap sanitizer when we used it, so make sure you get your little ones to go ahead of time. But at least there is an option.

So, when you have some time to go to Austin, Texas be sure to make a quick stop at the Mayfield Nature Preserve and Mount Bonnell which are just down the street from each other. I'll be posting about Mount Bonnell next. Be sure to check it out.

My girls loved to chase around the peacocks (at a slow pace of course).


Happy Texan Trekking!
Heather Joy


Wednesday, September 10, 2014

Do It Yourself: Sun Shades


Does anyone else have a crappy backyard layout?  I'm just being real and calling it for what it is! I can hear at least a couple people shouting, "amen!" A few years back now, we had our house build in Texas while we were still living in Arizona. I still know that it was God's plan and it's so cool to see his handiwork in getting us to Texas but....let's just say we learned a few things along the way.

We had never had a house built. We learned that we will probably never want to do it again to be honest.  However, one of our complaints was that we saw a printed layout of our house before we moved out but I don't believe they ever even showed us how our house would be situated on that lot. (I know! We should have asked. But lesson learned!) We were getting what we thought was a huge lot. We were in a cul de sac lot and were paying extra because of it so we weren't really worried about the size of our yard. We walked on the lot before we signed the papers and it looked huge!! But, needless to say, we have a stupidly shaped yard. They placed our house so far back on our lot that we have a LONG driveway and long front side yards and well....a stupidly shaped backyard.

We walk right outside our back door and we have our neighbors fence smack in our face. Okay, well maybe it's like 9 feet away...but it's really close people!! With it being SO close most of our concern and problem is with toys and balls being thrown into other people's yard and when your neighbors aren't very friendly and their dogs are mean you don't really get anything back. *Sigh.

We also only have a stub of a patio which is like 2 feet by 3 feet wide. We've wanted to add a large concrete patio slab but after counting the cost we ended up building the shades first and making it have the 'feel' of a patio without the huge expense of a patio.

Plus, we've had these shades in our closet for the last 6 years!! I kid you not! My In-laws were shopping at Costco one time and knew we were searching for a good deal and it was the end of Summer in Phoenix and they got 3 on mark down for us. It was a great deal. Surely we'd use them, right? Well, we finally have these 6 years later and I want to show you how we did it.


My husband went to a local lumber yard and bought some 12 foot cedar posts. He paid a pretty penny and you should too because they are going to take a beating with the winds and the last thing you want is a shade breaking off and flapping dangerously around in a fierce storm.

He also rented a one man auger machine, which in reality takes two people really but that's what it's called. Along with that he got some Quikcrete bags to solidify the posts into.

With everything at hand we looked at the size of the shades and we wanted it to float evenly in the middle between the house and fence. It's been awhile since we put these in but I believe it ended up being about 3 fee we added on each corner. We put it at an angle, so it was slightly higher up on the house.  We had a hard time figuring out how far apart to put the beams. We wanted to make sure we put enough room to be able to have length to tighten as the shade got pulled loose from wind and such but we also didn't want it to be too far apart and not have the shades provide adequate coverage. We didn't want three triangle spots of shade but rather as close to a unified shade as possible. We ended up setting the poles roughly 21 feet apart. As you'll see in the pictures it was enough to keep them from overlapping but we might have been able to get them a foot or two closer. But we're happy with how they turned out.


We used painter's tape on the fence to mark where to dig. Ryan and my brother set off to work digging the first hole.  One thing to note here: make sure you know what your rented equipment can do, otherwise you might end up in a big mess.  Enter mess....Ryan and Darren dug down the drill end really quickly into the ground. Now if the auger you rented had a reverse switch that wouldn't be a big deal but...ours didn't. The guys didn't realize that because of our hard clay based ground (which will be great for holding these poles up, but not great for working with it) they dug down so fast they didn't even give it a chance to pull up any dirt. They pretty much just drilled it into clay and there it was stuck...for the next 3 hours it took all of us to dig it out of the ground.  So if you look really closely you'll see the the base of the the farthest post has a very wide concrete bottom.


So after learning from their lesson, they jammed out the last two poled in less than 30 minutes. They dug down about 30 inches my husband said, which is as far as this auger let them go pretty much. We probably would have gone down more if possible but with our hard ground it will (and has) held up fine.  Instead of going so fast with the auger they put it in slowly and let the drill slowly pull out the clay as it went down. They had to pull it back up every so often because it wants to go down much faster than it should. So they drilled a little. Stopped. Pulled it back up, just to clean out the drill and then they put it back in to go down a little farther.

Now that you we had our holes they mixed the concrete bags with the water. While I held the post in the right spot using a level, Ryan was able to fill in all around the pole. It was such a deep hole we really didn't even have to prop up the poles from leaning. We kept checking them periodically but they never even tilted, which was awesome!


After your posts are set then you need to add the hardware to the top of the posts. My husband just went to the store and got what he needed. He got a cable tensioner with a hook and some eyes that he was able to mount on the posts. He also got a few wire cable clamps (one for each corner of the shade)  I included some pictures so you can see the hardware and how he mounted them on.


Make sure to leave some slack on the rope and just use those small little nuts to tighten up and hold the extra rope. You need enough to hang on and pull so you can tighten the shade later. You can slowly clip off the excess if needed though, just don't cut too short!!

(This is where you can see that little bolt which holds the extra string up so you have slack to pull when you have to tighten later.)


Once you have the hardware on your post then attach your shades onto the top of the beams.


(This is the main central beam which holds the three shades.)

 (Here is how the attachment looks on one of the side beams, with just one shade attached.)


At this point it's kind of a grab the ladder and hold up where the shade would go on the house and mark where it will look the best. We started with the middle shade because that gave us our control. We wanted the other shades to fit as closely to the middle one as possible.

(A view of the attachment to the house.)

 (Another view of how it's attached to the house.)


The shades are angled slightly, so the mounts are raised a little bit higher on the house versus the posts. It makes it have a more open feel than if they were just flat.

After the middle one was set we started with one side shade at a time and pulled the rope to the best spot so there was as little gap as possible between the shades but we also didn't want them to rub. You can see in this photo the final placement of where the ropes were attached to the house.

After everything was adjusted and tightened we snapped a couple more photos.


Please note that you need to plan to tighten your shade after a couple days of good wind. The shade will loosen a lot after it finally gets pulled tight by the wind. My husband has gotten in a good habit of after a really bad storm he will tighten them back up again or he just plans to do it during the Summer.

We also added some strings of outdoor lights onto the shades. We just strung them up around the shade hardware and ziptied them onto where they wouldn't slip. We used 3 strands and had a bunch extra so we took off the extra bulbs and stapled it to the back of the last post. So you can't see it from the front at all.

Here are some more pictures to enjoy!


Well, I hope this has spurred you on to build your own sun shades. We enjoy the fact that it adds a patio feel without having to pay for the whole concrete slab. We recently bought a picnic table and put it underneath and enjoy our lunch outdoors sometimes now.

God Bless!
Heather Joy

Wednesday, September 3, 2014

My Homeschool Planner

Well, since I've been showing you a bit of our homeschool routine I thought I might as well show you the gem of the crop.  I'm going to take you through my entire homeschool planner.

I've had a couple different lesson plans within my notebook that I've used and since homeschooling needs are ever changing I want to make sure to show you both versions. I hope you will find them beneficial to you.  I'll go through the notebook with my original planner and then at the bottom I will show you a new revised planner I just created to help me get even more organized with things.

Hooray for organization!


Well, to start things off I created this cover.  I just found a free frame, background and silhouette online and put them together to make my cover.  I used this same theme to organize all of my binders and drawers etc. They all have the gray chevron with the happy pink frame that just makes me smile.


Open it up and here's what you see:
This is the first version of my planner.  This is what I access the most so that's why it's on top. I created this last year and it worked very well for me at the time.  It gets broken down into each day (Thursday-Friday is on the back side) with the subjects listed at the side.  I also included in type some of the things that were more consistent with our curriculum, so I didn't have to write it in all the time.


After my planner I have my God's Purpose Of Education Handout that I received at one of my teacher training way back when I was a kindergarten assistant teacher at a Christian school out in Arizona for over 8 years.  We got lots of resources and training in my years there and this handout was found one day in my pile of things I saved.  I'm keep it in here as Biblical reminders of why education is important and helps me remember the ultimate goal: raising up a generation of good character, who's heart is towards God and His ways.


After that I have a couple table of contents or chapter guides for some of the curriculum I've chosen to use.  This helps me at a glance to check what's up and coming.  Sometimes I'll mark down the month or week we did something, so I know where we stand on everything.  This has really helped me in saving time when it comes to planning next week. I can quickly pull from these Table of Contents of my main books: math, writing, Bible, etc. and have a better jumping off point.


Next up is my Character Training Lesson Plan.  I created this in the future hopes of starting to do a character focus for each week or month and work it into our plans.  We haven't used it yet because my girls are still so little and we're just focusing on key traits like being 'nice' to our sister. Ha! But I thought I would just give you a peek at what I've prepared for the future too.  It's important to have a vision. "Without vision the people perish" says the Bible. 


Lastly, to organize my old lesson plans I put two small sticky note tabs in the back of my binder.  I place the 'old' lesson plans back there as well as keep on hand all my 'new' unused lesson plans for upcoming weeks.  Makes it easy for me to look back to see what we focused on.

I hope you've enjoyed peeking through my planner.  I'm still on this journey of learning to organize my homeschooling life with my girls.  I can only share what works for us...and I'm sure I will find better ways along the way. But I hope this inspires you to organize your planner.

Happy Homeschooling and God Bless!

Heather Joy

Wednesday, August 27, 2014

Our Texas Playroom Addition


Recently I have been obsessed with something called New Braunfels Mom's Shop 'N Swap. It's like a craigslist for New Braunfels' moms. You can post to sell something and if it's fairly cheap just leave it on your porch and send the address privately to the person requesting to buy. They pick up and leave the money under your door mat.  It works great because being a busy mom I don't have all the time in the world to put together a garage sale, but I can find the time to post a couple items here and there and when they sell just place them on my porch.

I have been obsessed with the Shop 'N Swap because it's a great way for me to find decor and furniture for our house really cheaply. The people on there are looking for a good deal, so the sellers know they need to post it for a good deal or it won't sell. Hence, I get some killer deals on awesome stuff!!

Want to know my latest find?
---Of course you do!

Well, I was browsing one day and came across something that made me smile, something that warmed my heart, something that made me happy to be a Texan.....a roping steer!

Yes, we found a used roping steer for a smoking deal! When I lived in Arizona there was no way you'd find a used roping steer, well at least not in Phoenix. Now though, we have an awesome roping steer set up in our playroom and we are loving it.  Of course this meant I had to shift everything around once again to make room in our playroom for this big beast.


The main reason we got it, besides the fact that it makes my heart happy, is the fact that we have already been blessed with two horses.  So the girls on a normal basis sit side by side on their horses and race each other.  Well, now after we've rearranged the room they can sit side by side and practice roping the steer.


I also plan to put it outside as a fun activity when we host parties. We are always trying to use our house to bless our church family and whoever the Lord wills. Our playroom is set up nicely for the ages of kids we've had in our circle of friends from the church, however this last party we hosted we had a few new families and our age range went up to the teens. So, I thought that if this was set outside with some real lassos then they might have some fun and it's more fun to keep them outside which keeps the parents happy.

Here are a couple more pictures of the roping steer in action:


I used to have the cupcakery where the horses are and on the wall it was the sign for the 'Sweet Sister's Bakery'. Since, we changed it up I created the western show sign below.


Hope you've enjoyed another peek at our ever transforming playroom from here in Texas!

God Bless!
Heather Joy