I previously posted about the Sweet Sisters Bakery stand that my husband and I had made for our girls for Christmas. The entire thing was just an experiment but we're happy with how everything turned out. I wasn't really sure how to do the canopy. I just winged it really. So, for all of you really gifted at sewing I'm sure there might be an easier way to what I did but just know I go for the results and I'm learning the techniques along the way. I made it with a scallop edge on one side with four straps underneath to tie it to the two dowel rods that it rests on.
Start with your fabric cut to the length you need it to be. I just threw a piece of fabric over the two dowels to where I would like it and then doubled it. Place it right sides together.
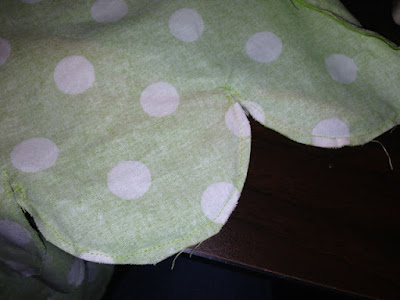
Draw your scallops onto one edge. This is the wrong side of the fabric so you don't have to worry about it showing. I did this by measuring my width dividing by how many scallops I wanted (it ended up being 8) and then you get the approximate width of what each scallop should be. I drew one that length and then just traced it repeatedly next to one another the whole width of the fabric.
After you trace it's time to sew along your scallop edge.
Next, you need to cut all the excess fabric off from around the scallops. Now this is where my novice ness shows and it seemed to bunch up for me, so I REALLY had to go in there in the little nitch between each scallop so it didn't gather up. It took some time but after working at it and then ironing it down I think it turned out okay.
Next, I top stiched all the way around, leaving a large gap open, so I could sew on the tie backs.
For the tie backs you just need a long, fat rectangle. Sew down the side. Cut the excess off, flip inside out and iron flat. Then flip the ends underneath and top stitch those down. Now make 3 more.
Now take those 4 ties and take your piece of fabric. No rocket science here, but place the fabric over the two rods see where you want it to sit and then pin them where you want. Make sure to pin in to one side. Then sew them on, only going through one side.
After you sew the steps on turn the whole canopy inside out and then turn in the last edge, pin and straight stitch the seam closed.
I should have taken picture when I attached the ties but what I did was throw the canopy on the top. Lined up where I wanted them to be and just pinned them on. Then I just opened the large piece up and stitched the ties onto the back side only, so not stitching shows on the top. Once my four tie backs were sewn on I turned last edge under on the side and top stitched it all the way closed. And viola! All done!
Happy sewing and God Bless!
Heather Joy


No comments:
Post a Comment